As more schools are closing due to COVID-19, music teachers are looking for options to keep the learning going. SmartMusic is one way performance ensemble teachers are helping their students continue to practice. If you’re in a situation where you need access to tools to help students continue practicing, SmartMusic has given teachers and students affected by COVID-19 free access to their full content library through June 30, 2020. If you’ve signed up and enrolled your students, you might be asking yourself “well, now what do I do with this?”
Don’t fear, your resident virtual music teacher is here! Before the sudden closure of schools, I was already teaching music virtually full time and had been doing so for several years. I regularly use SmartMusic for my extracurricular virtual band/orchestra and virtual choir. A few tweaks can help make your students’ learning experience as easy and effective as possible.
Create A Single Warm Up
SmartMusic offers a lot of content that’s already available and easily assignable. The temptation might be to assign lots of good warm ups for your students to practice at home. However, as a full time virtual teacher, I found the more my students were assigned at one time, the less likely they were to complete all of their assigned content. Assigning a warm up every day or assigning multiple warm ups per week clutters up students’ SmartMusic dashboards and might make them feel overwhelmed.
Instead, create a single, simple 5-minute warm up that encompasses a few elements you want students to practice (long tones, scales, dynamics, accents, etc.). If you don’t have access to Finale or another notation software, SmartMusic’s Compose feature lets teachers create assignments from scratch. With a premium subscription, you can also create a single, simple 5-minute warm up that encompasses a few elements you want students to practice (long tones, scales, dynamics, accents, etc.) using the Compose feature lets teachers create assignments from scratch.
Once you’ve chosen or created a warm up, assign it to be “due” at the end of the semester so it shows up at the bottom students’ due assignments. This makes it a little easier for students to find as you assign content from various pieces of music. Explain to your students they should play this warm up before working on any assigned pieces any time they sit down to practice.
Clearly Label Assignments
Even though there are due dates built into SmartMusic’s assignment feature, I find that sometimes students still miss those dates. When I set up assignments, I include the due date directly in the title.
As mentioned above, I also include a warm up for students to use when they practice and label that as “practice only” so they know not to submit the assignment. Additionally, I try to keep the sections of music I assign relatively short. Therefore, I like to assign the full pieces of music we’re playing at performance tempos so students can still work on the music outside of the sections I assign for the week. I set all “practice only” assignments to be due on the last day of the semester so they always show up at the bottom of students’ assignments list.
Examples of Assignment Labels:
- Section of music: Due Tuesday, Mar. 31 Air for Band
- Warm Ups: PRACTICE ONLY – Warm Up in Bb – DO NOT SUBMIT
- Entire Piece to Practice: PRACTICE ONLY – Air for Band – DO NOT SUBMIT
Model How to Practice
Take time to show students how to effectively use features in SmartMusic. There are so many great features but they will mean nothing to your students if they don’t know how to use them. If you need an intro to using SmartMusic yourself, check out this video that SmartMusic created for teachers who are new to the platform.
I recommend creating a video that includes your screen as well as a demonstration of you practicing on an instrument or singing. This will allow students to see what is happening on the screen in SmartMusic as well as what they should be doing as they sing or play their instrument. Screencast-O-Matic allows you to capture screenshare and your webcam simultaneously so it is a great tool to use to create this kind of video. You may also consider giving students written step by step instructions they can use to follow along as they watch the video and while they practice later on.
If you would like to check for student understanding of your video, consider using PlayPosit. PlayPosit allows you to add questions to any video and prevents students from skipping ahead. You can easily see if students are grasping the content or may need further clarification.
Here is a sample of written instructions to guide students as they practice:
- Press Record and play the whole section through (do NOT submit)
- Find the section of 1-4 measures that has the most red/yellow notes
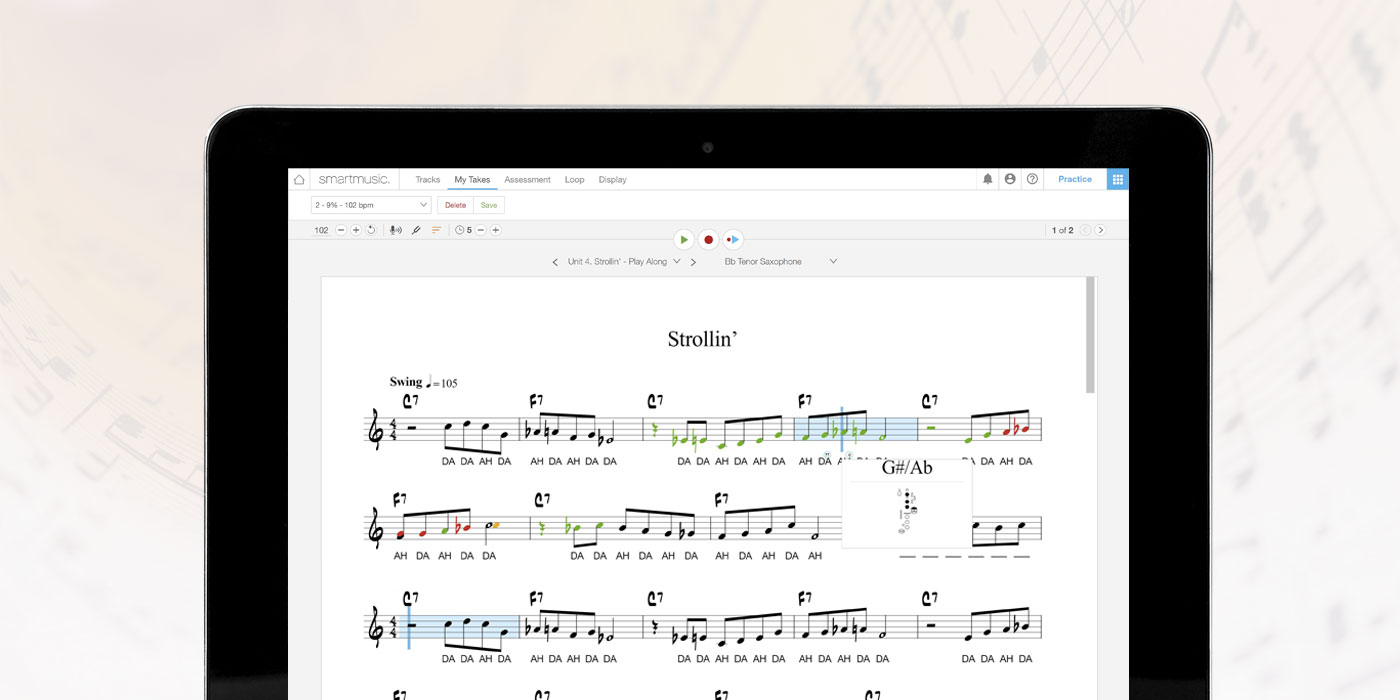
- Isolate the section of 1-4 measures by using the Loop tool. To do that, click on “loop” then “set.” Drag the two blue markers so that the measures you want to to practice are highlighted in blue.
- Check to make sure you have the correct fingering on any red note by clicking on the notehead and then clicking on the tiny circle to the left.
- Once you have the correct fingerings, turn ON My Part and Metronome and turn OFF Accompaniment.
- Slow the tempo down by at least 10 or more bpm by clicking on the minus sign.
- Play the looped section. If you are still having trouble playing, slow the tempo down further by at least 5 bpm or more.
- Once you play the looped section 3 times without any mistakes, increase the tempo by 3 bpm using the plus sign. Continue to increase the tempo until you have reached the tempo you are required to play for submitting the assignment.
- Repeat this process for any other sections with red/yellow notes.
- Once you can play the entire assignment and score at least 90%, don’t forget to press submit.
You might also want to include a note for students that if they are practicing and can’t get to 90%(or whatever percentage you choose for them), they should reach out to you. Sometimes there are occasional issues where their computer mic won’t pick up on everything correctly.
Creating a Virtual Ensemble with SmartMusic Recordings
If your students are going to be out of school for more than two weeks, you might want to hear what they sound like together. In order to create my own school’s full ensemble recordings, I use students’ SmartMusic recordings and combine their individual parts into one file about every two weeks.
When you set up assignments, it is important you allow students to record with the metronome and set the tempo to be “EXACTLY” so all students will be recording at the same tempo. This will help individual student parts line up more easily. Ideally, students should record with headphones so the metronome click does not come through as they play. Using headphones or earbuds will also produce the best assessment results.
Before students press “submit” on their SmartMusic Assignment, ask them to press “save.” This will download their current take. Have students label their file with their last name and part (for example: “Rose, Flute”). Then they can upload their part to a Google Drive folder.
If students forget to do this before they press submit, there isn’t currently a way to easily download their recording. If this ends up happening, I found a work around by using Screencast-O-Matic. Record the screen with “computer audio” enabled while a student’s SmartMusic recording is playing. After the section is recorded, click on edit then under audio. You will have the option to download “computer audio” only, which gives you a WAV file of the students’ SmartMusic recording. This can obviously be a more time consuming process, so it is best to try to get students to download their recordings before submitting.
When you have all of your student’s recordings, you’ll need to combine them together. I like to use Garageband, but this program is only available on Macs. If you are looking for a free alternative, consider using Audacity.
While this may seem like a lot at first, combining parts definitely gets easier with time and practice. Now, I can usually put students’ recordings together in under an hour.
Want to Learn More about Virtual Ensembles?
If you want to learn more about how I use Zoom for rehearsing my virtual ensembles, how I set up SmartMusic, or how I combine students’ individual parts in GarageBand, be sure to check out the Music Educators Creating Online Learning Facebook Group. I will be hosting live trainings throughout the time the teachers are out of school. If you aren’t able to catch something live, check out the “virtual teaching” post topic tag. All trainings are recorded for people to view later and can be found under that tag.
For more helpful tips and tricks, check out my website themusicalrose.com or follow me on Instagram @the_musical_rose.

Michelle Rose teaches middle and high school general music and directs the extracurricular virtual band/orchestra and choir at North Carolina Virtual Academy. She is also the director of the International Music Education Summit Virtual Honor Band. Michelle holds a Bachelor's Degree in Music Education and Performance (flute) from Elon University and is currently pursuing a Master's in Music Education from The University of North Carolina Greensboro. She is a teacher-author and blogger at themusicalrose.com. Michelle has been a presenter at several conferences and has been a guest speaker for pre-service music teachers at colleges across the country. In her free time, she enjoys baking, sewing, and going on walks with her dog Tovy (short for Beethoven).